Click the hole numbers below to view details
Kings Course
| TEE | YDS | PAR |
|---|---|---|
 |
347 | 4 |
 |
336 | 4 |
 |
316 | 4 |
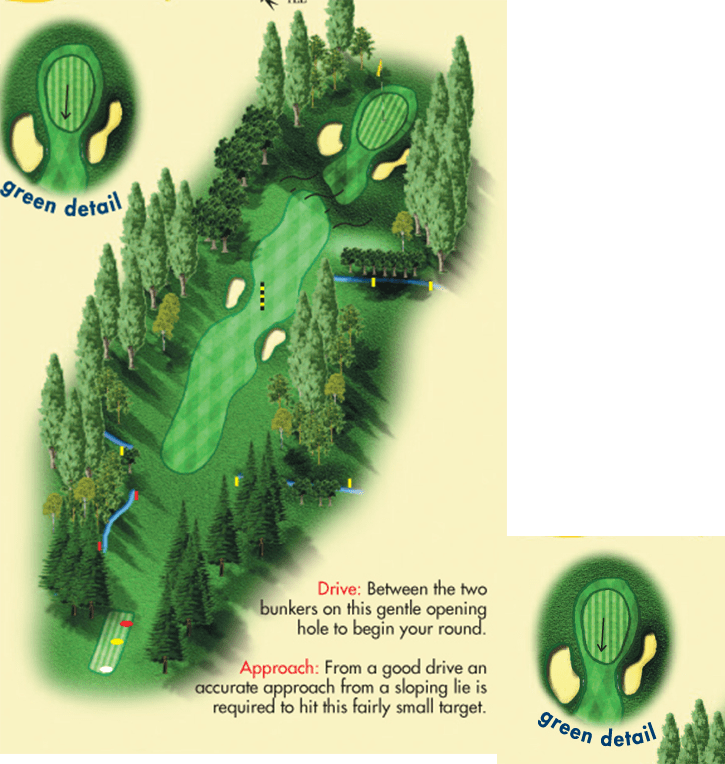
Kings Hole 1
Drive: Between the two bunkers on this gentle opening hole to begin your round.
Approach: From a good drive an accurate approach from a sloping lie is required to hit this fairly small target.
| TEE | YDS | PAR |
|---|---|---|
 |
352 | 4 |
 |
343 | 4 |
 |
333 | 4 |
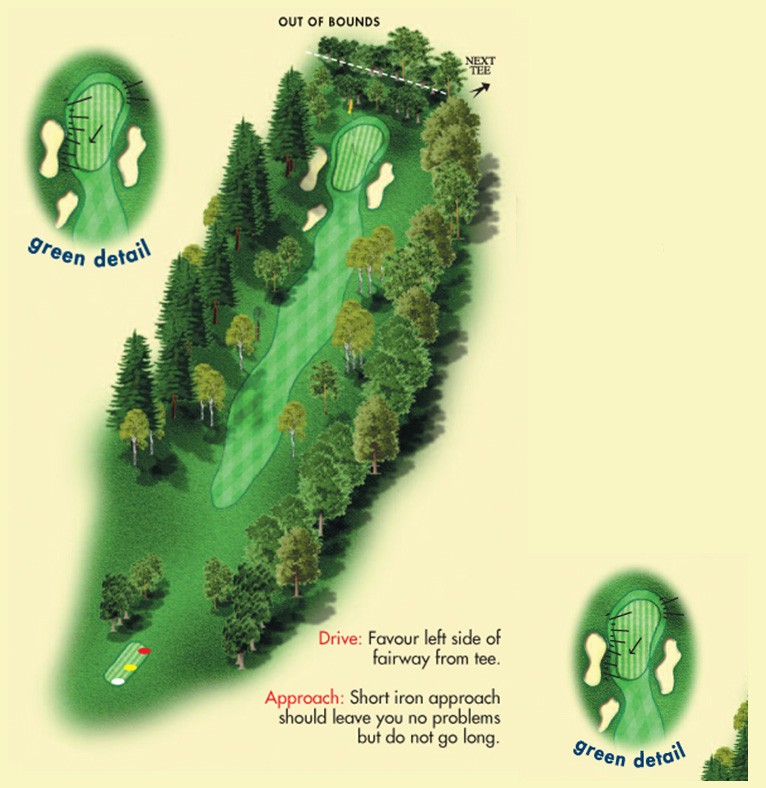
Kings Hole 2
Drive: Between the two bunkers on this gentle opening hole to begin your round.
Approach: From a good drive an accurate approach from a sloping lie is required to hit this fairly small target.
| TEE | YDS | PAR |
|---|---|---|
 |
515 | 5 |
 |
506 | 5 |
 |
462 | 5 |
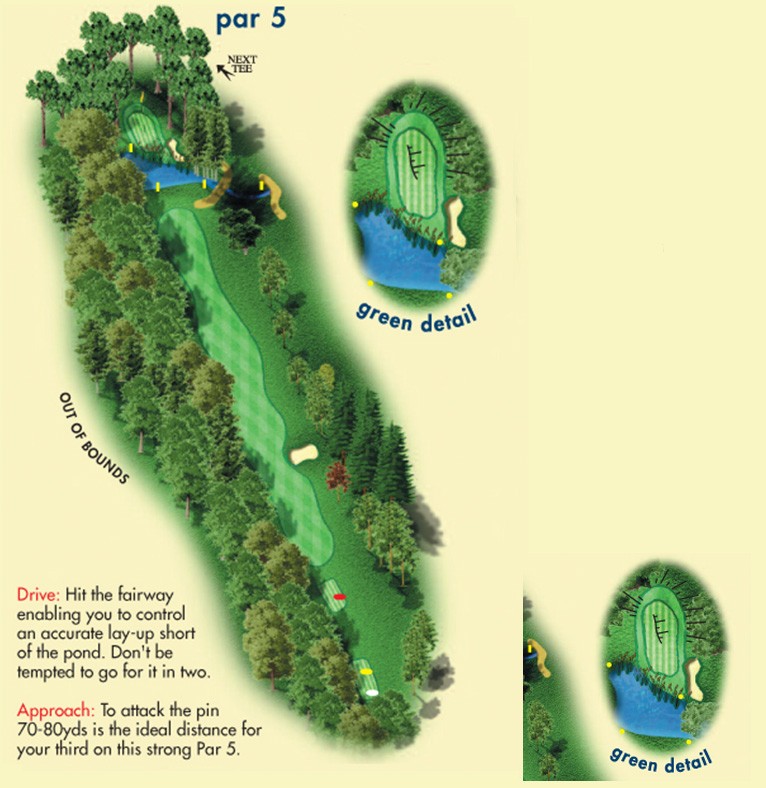
Kings Hole 3
Drive: Hit the fairway enabling you to control an accurate lay-up short of the pond. Don’t be tempted to go for it in two.
Approach: To attack the pin 70-80yds is the ideal distance for your third on this strong Par 5.
| TEE | YDS | PAR |
|---|---|---|
 |
484 | 5 |
 |
473 | 5 |
 |
452 | 5 |
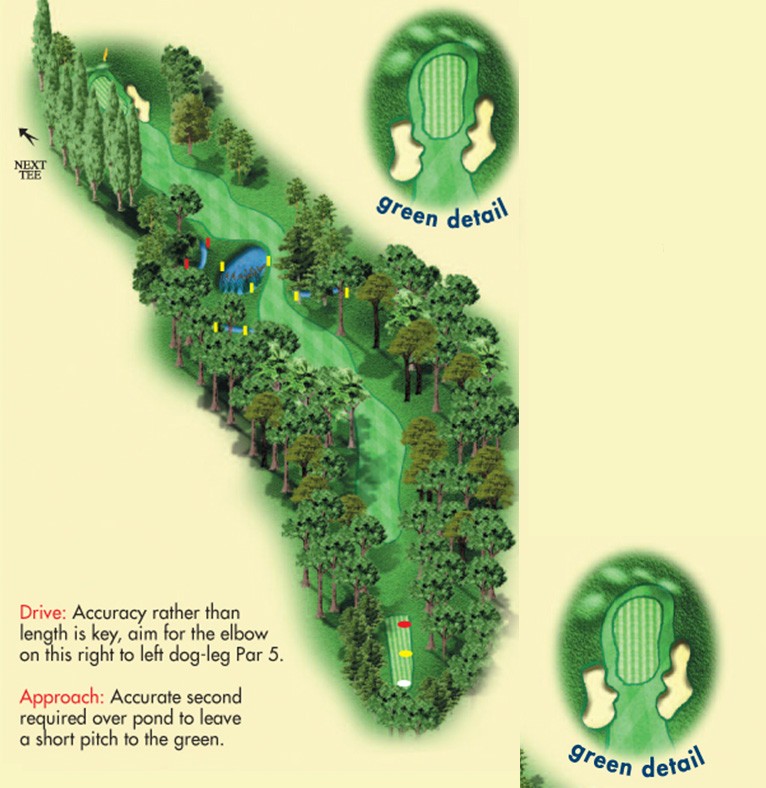
Kings Hole 4
Drive: Accuracy rather than length is key, aim for the elbow on this right to left dog-leg Par 5.
Approach: Accurate second required over pond to leave a short pitch to the green.
| TEE | YDS | PAR |
|---|---|---|
 |
380 | 4 |
 |
371 | 4 |
 |
361 | 4 |
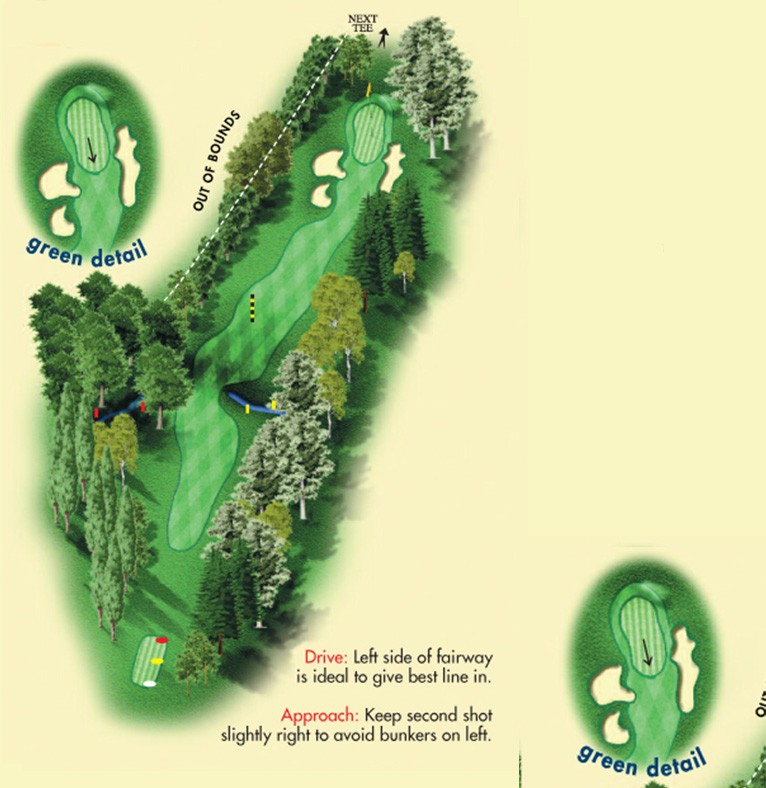
Kings Hole 5
Drive: Left side of fairway is ideal to give best line in.
Approach: Keep second shot slightly right to avoid bunkers on left.
| TEE | YDS | PAR |
|---|---|---|
 |
414 | 4 |
 |
314 | 4 |
 |
414 | 4 |
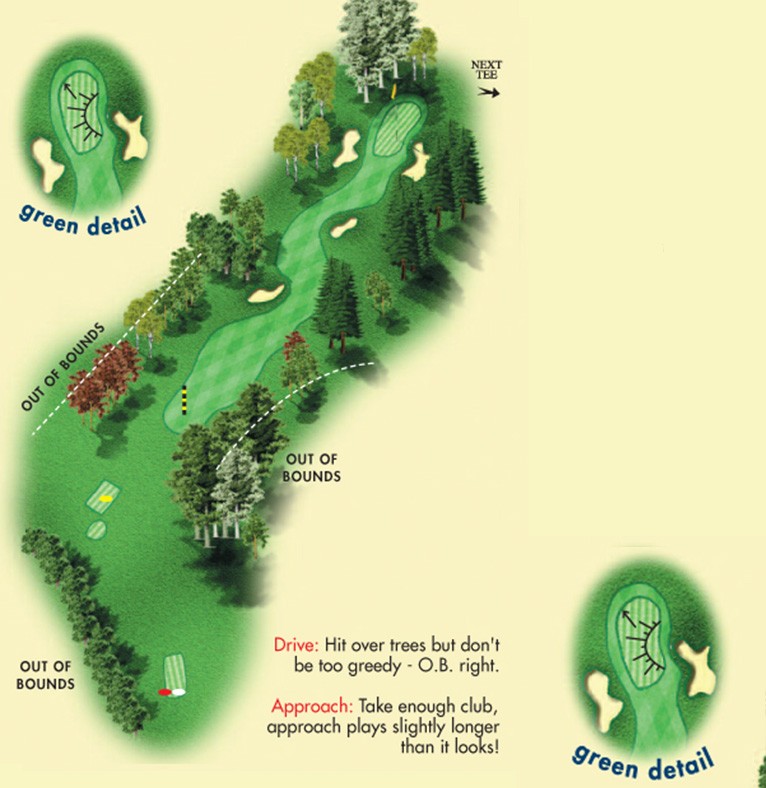
Kings Hole 6
Drive: Hit over trees but don’t be too greedy – O.B. right.
Approach: Take enough club, approach plays slightly longer than it looks!
| TEE | YDS | PAR |
|---|---|---|
 |
370 | 4 |
 |
361 | 4 |
 |
349 | 4 |
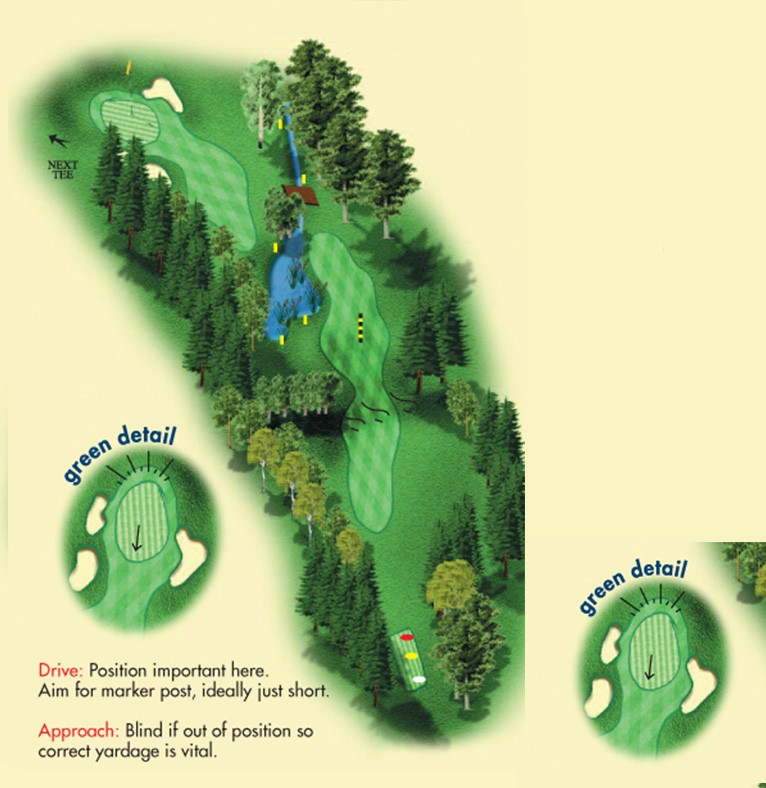
Kings Hole 7
Drive: Position important here. Aim for marker post, ideally just short.
Approach: Blind if out of position so correct yardage is vital.
| TEE | YDS | PAR |
|---|---|---|
 |
393 | 4 |
 |
373 | 4 |
 |
359 | 4 |
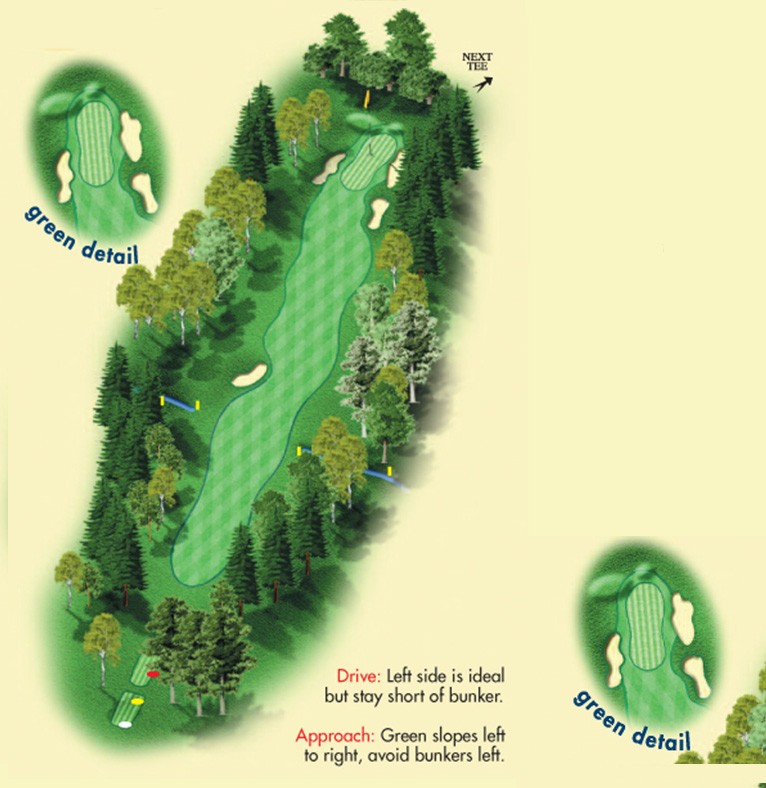
Kings Hole 8
Par 3: Slightly uphill to a two tier green..
| TEE | YDS | PAR |
|---|---|---|
 |
169 | 3 |
 |
156 | 3 |
 |
135 | 3 |
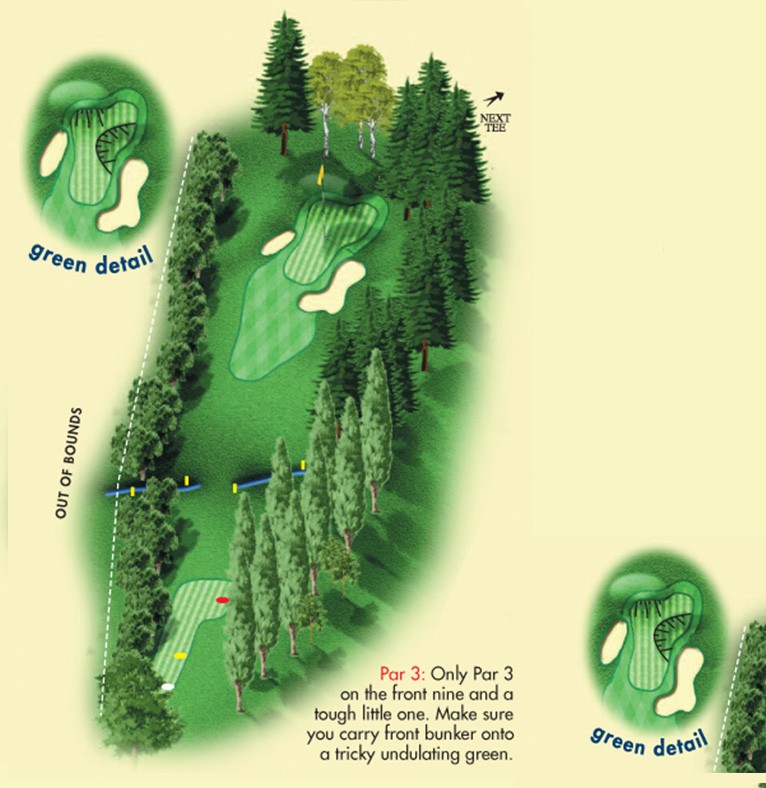
Kings Hole 9
Par 3: Only Par 3 on the front nine and a tough little one. Make sure you carry front bunker onto a tricky undulating green.
| TEE | YDS | PAR |
|---|---|---|
 |
361 | 4 |
 |
303 | 4 |
 |
296 | 4 |
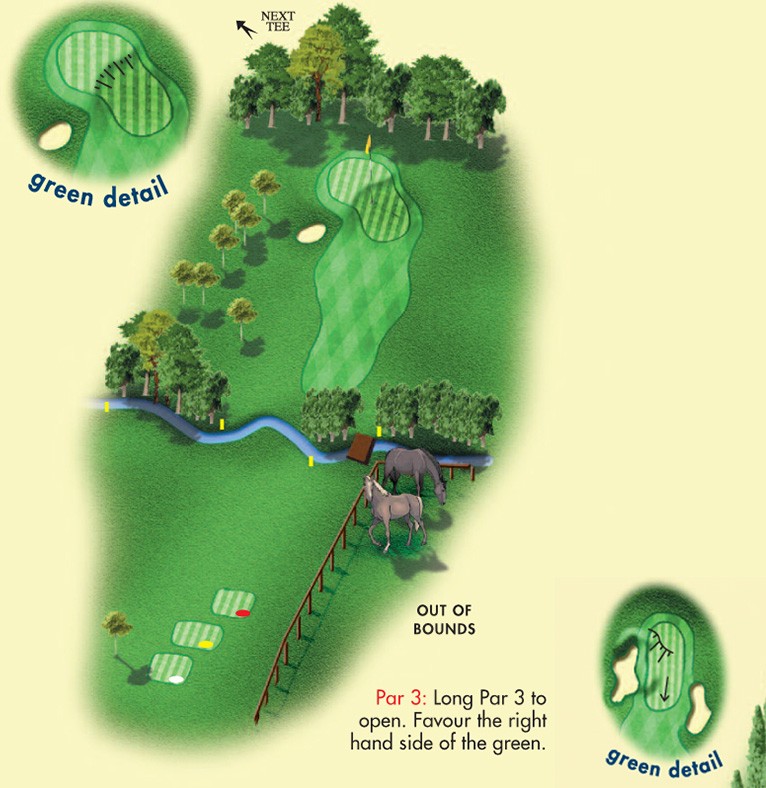
Kings Hole 10
Drive: Again length is not an issue, aim to be on the right half of fairway. Be careful of tree left and ditch right.
Approach: From a good tee shot a straightforward short iron to this green is all that is required.
| TEE | YDS | PAR |
|---|---|---|
 |
335 | 4 |
 |
325 | 4 |
 |
310 | 4 |
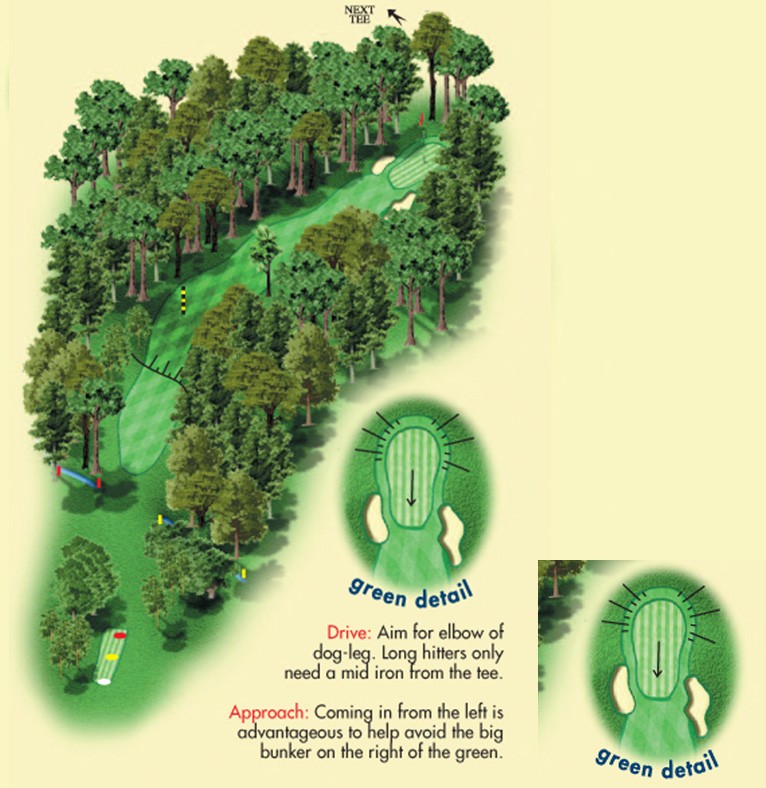
Kings Hole 11
Drive: Aim for elbow of dog-leg. Long hitters only need a mid iron from the tee.
Approach: Coming in from the left is advantageous to help avoid the big bunker on the right of the green.
| TEE | YDS | PAR |
|---|---|---|
 |
336 | 4 |
 |
331 | 4 |
 |
323 | 4 |
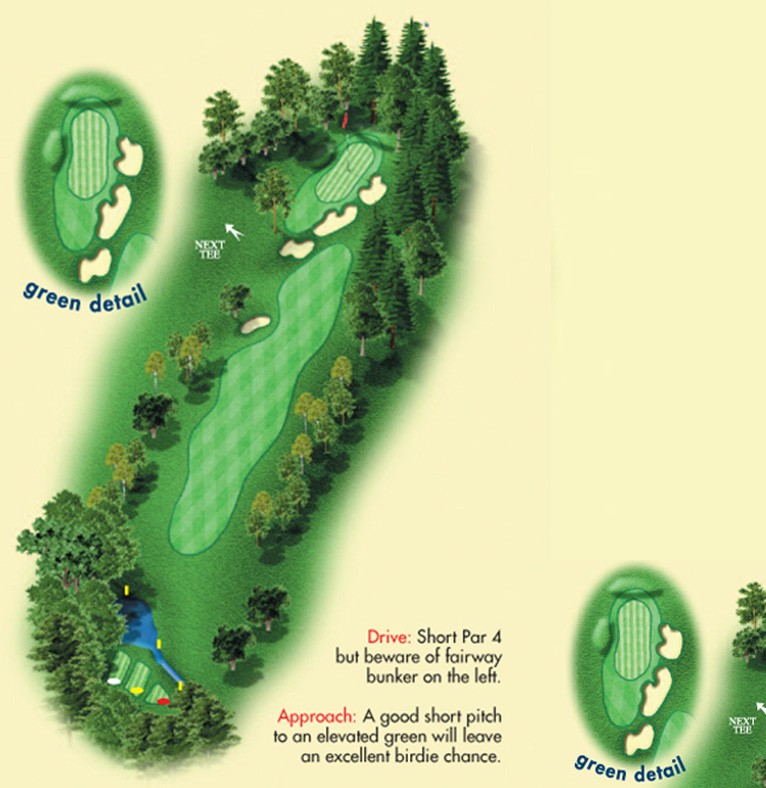
Kings Hole 12
Drive: Short Par 4 but beware of fairway bunker on the left.
Approach: A good short pitch to an elevated green will leave an excellent birdie chance.
| TEE | YDS | PAR |
|---|---|---|
 |
385 | 4 |
 |
375 | 4 |
 |
346 | 4 |
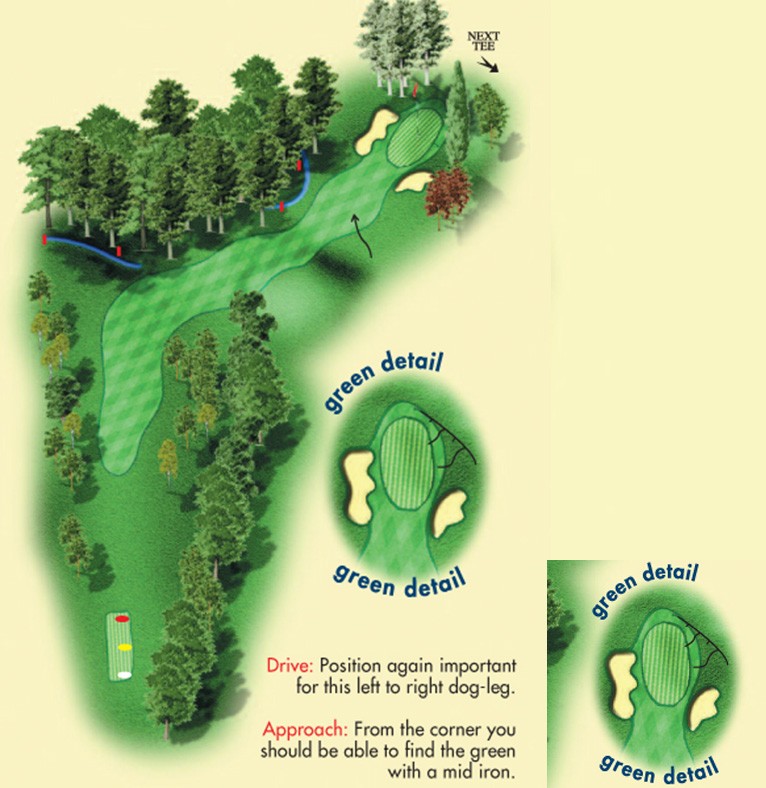
Kings Hole 13
Drive: Position again important for this left to right dog-leg.
Approach: From the corner you should be able to find the green with a mid iron.
| TEE | YDS | PAR |
|---|---|---|
 |
483 | 5 |
 |
474 | 5 |
 |
454 | 5 |
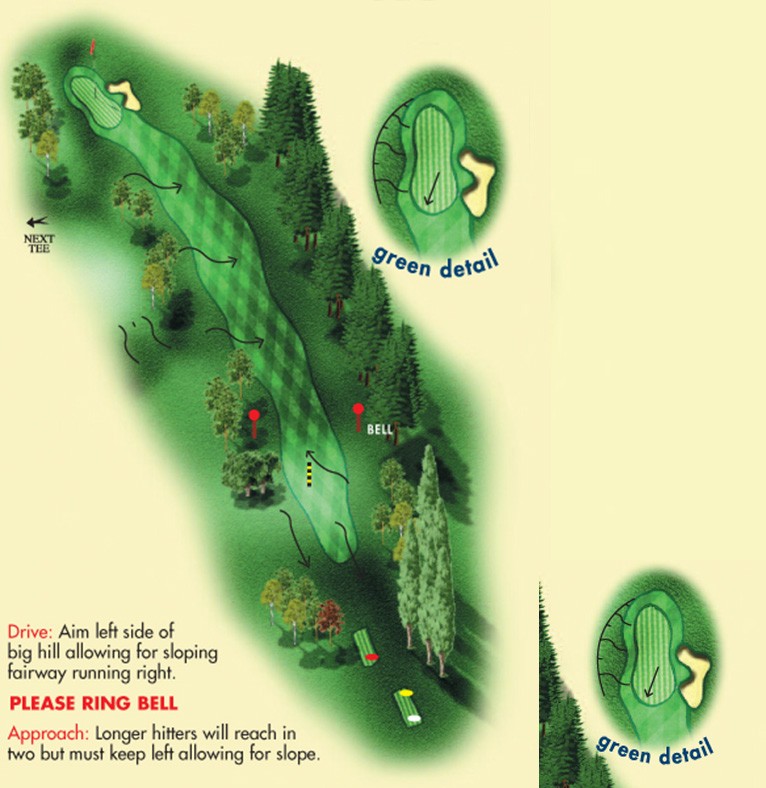
Kings Hole 14
Drive: Aim left side of big hill allowing for sloping fairway running right.
Approach: Longer hitters will reach in two but must keep left allowing for slope.
| TEE | YDS | PAR |
|---|---|---|
 |
135 | 3 |
 |
108 | 3 |
 |
99 | 3 |
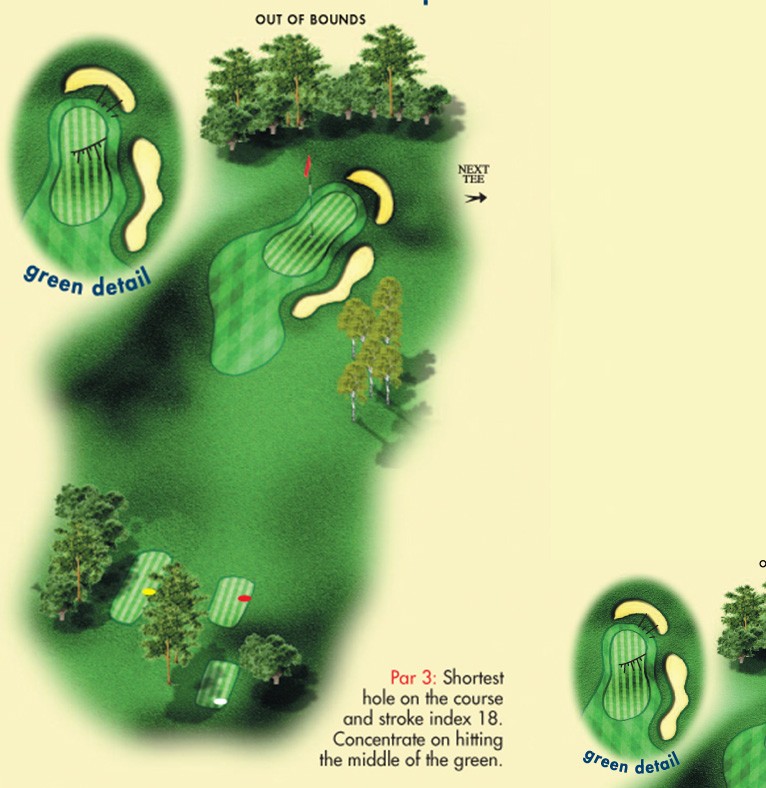
Kings Hole 15
Par 3: Shortest hole on the course and stroke index 18. Concentrate on hitting the middle of the green.
| TEE | YDS | PAR |
|---|---|---|
 |
184 | 3 |
 |
175 | 3 |
 |
158 | 3 |
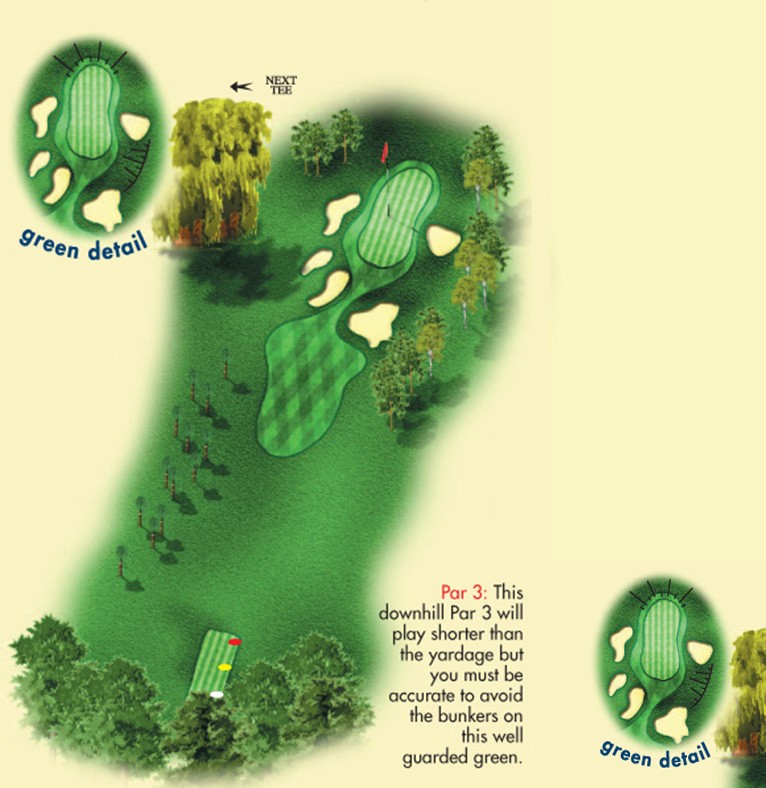
Kings Hole 16
Par 3: This downhill Par 3 will play shorter than the yardage but you must be accurate to avoid the bunkers on this well guarded green.
| TEE | YDS | PAR |
|---|---|---|
 |
420 | 5 |
 |
412 | 5 |
 |
403 | 4 |
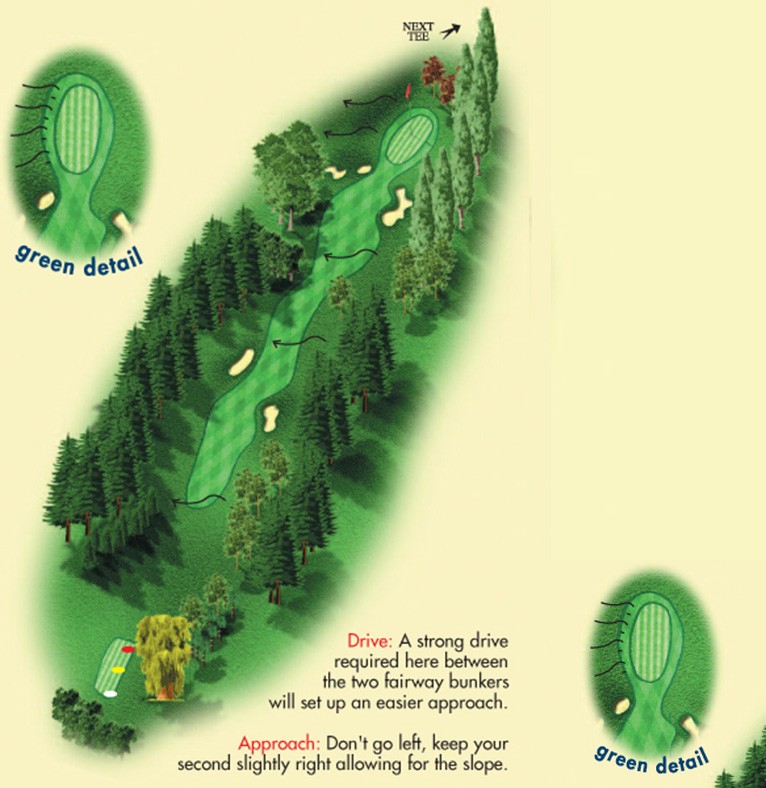
Kings Hole 17
Drive: A strong drive required here between the two fairway bunkers will set up an easier approach.
Approach: Don’t go left, keep your second slightly right allowing for the slope.
| TEE | YDS | PAR |
|---|---|---|
 |
386 | 4 |
 |
380 | 4 |
 |
363 | 4 |
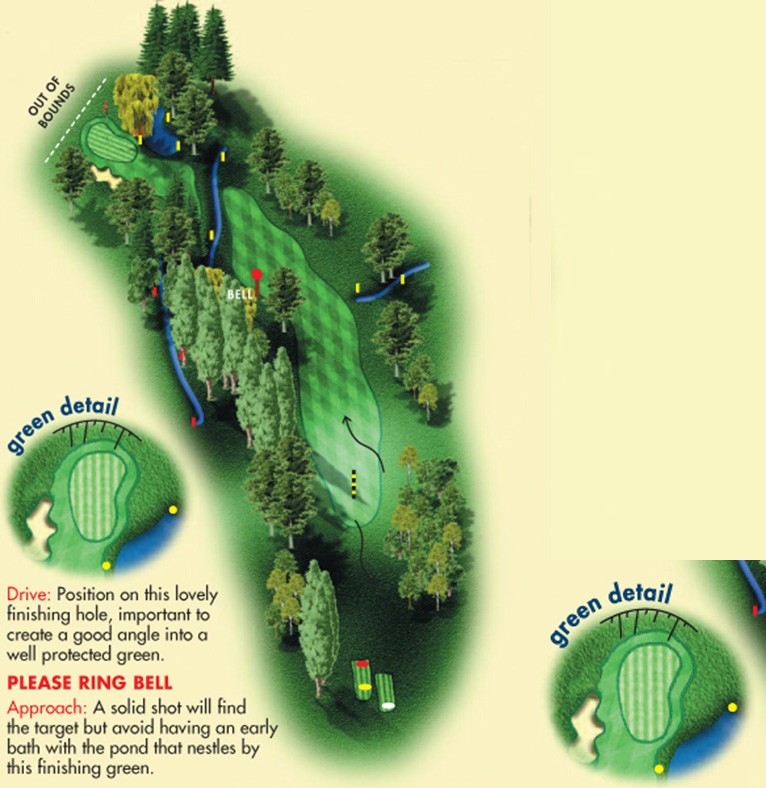
Kings Hole 18
Drive: Position on this lovely finishing hole, important to create a good angle into a well protected green.
Approach: A solid shot will find the target but avoid having an early bath with the pond that nestles by this finishing green.

