Click the hole numbers below to view details
Jubilee Course
| TEE | YDS | PAR |
|---|---|---|
 |
215 | 3 |
 |
202 | 3 |
 |
182 | 3 |
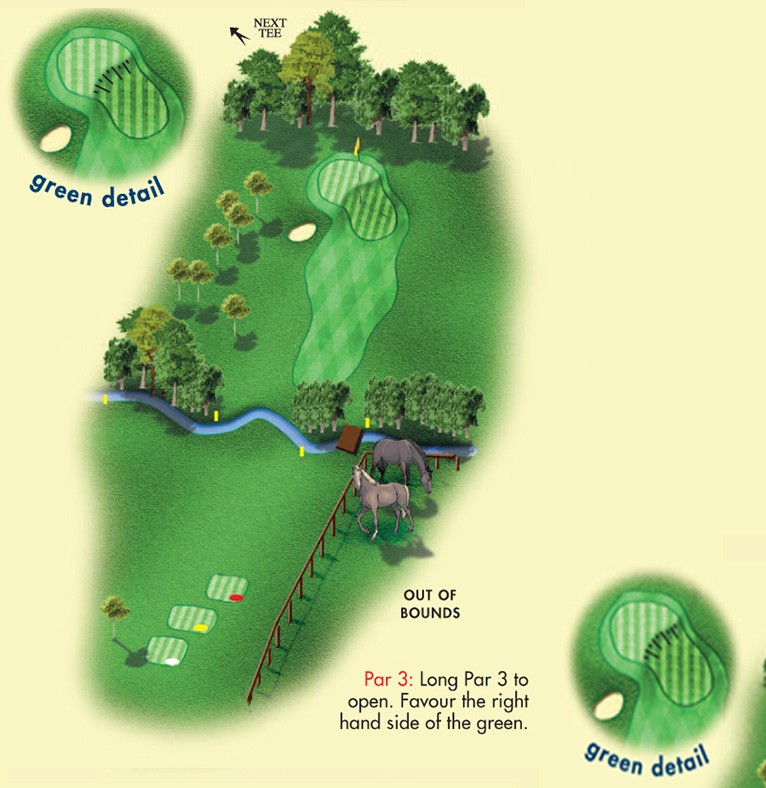
Jubilee Hole 1
Par 3: Long Par 3 to open. Favour the right hand side of the green.
| TEE | YDS | PAR |
|---|---|---|
 |
215 | 3 |
 |
202 | 3 |
 |
182 | 3 |
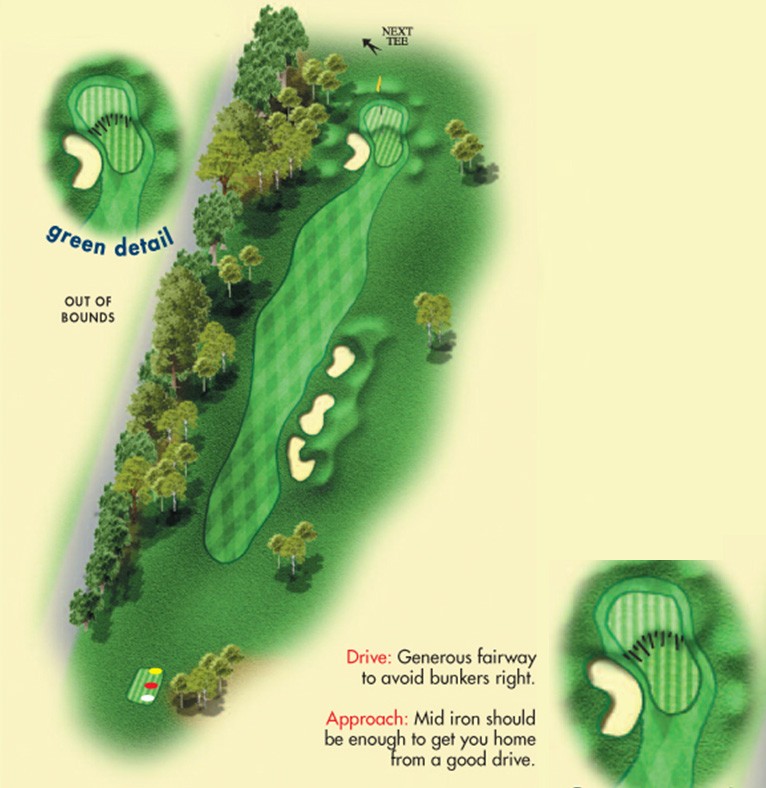
Jubilee Hole 2
Drive: Generous fairway to avoid bunkers right.
Approach: Mid iron should be enough to get you home from a good drive
| TEE | YDS | PAR |
|---|---|---|
 |
348 | 4 |
 |
325 | 4 |
 |
304 | 4 |
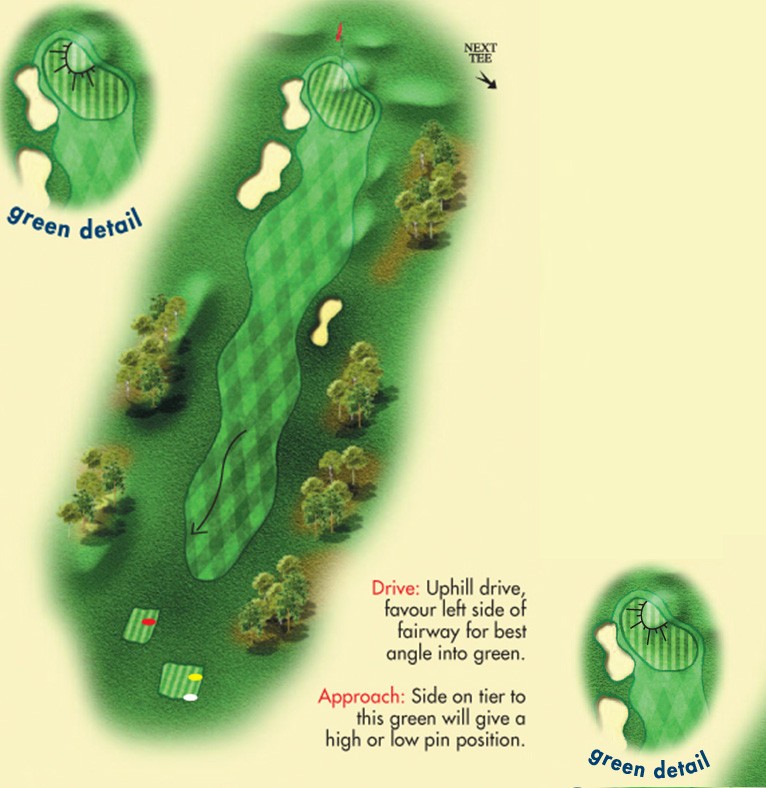
Jubilee Hole 3
Drive: Uphill drive, favour left side of fairway for best angle into green.
Approach: Side on tier to this green will give a high or low pin position.
| TEE | YDS | PAR |
|---|---|---|
 |
324 | 4 |
 |
306 | 4 |
 |
270 | 4 |
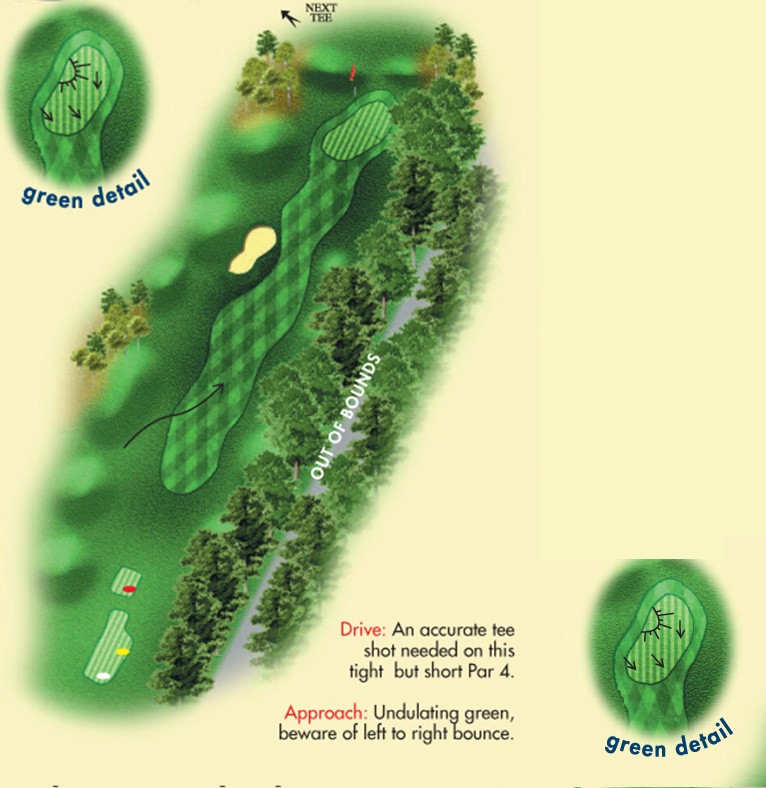
Jubilee Hole 4
Drive: An accurate tee shot needed on this tight but short Par 4.
Approach: Undulating green, beware of left to right bounce.
| TEE | YDS | PAR |
|---|---|---|
 |
132 | 3 |
 |
123 | 3 |
 |
117 | 3 |
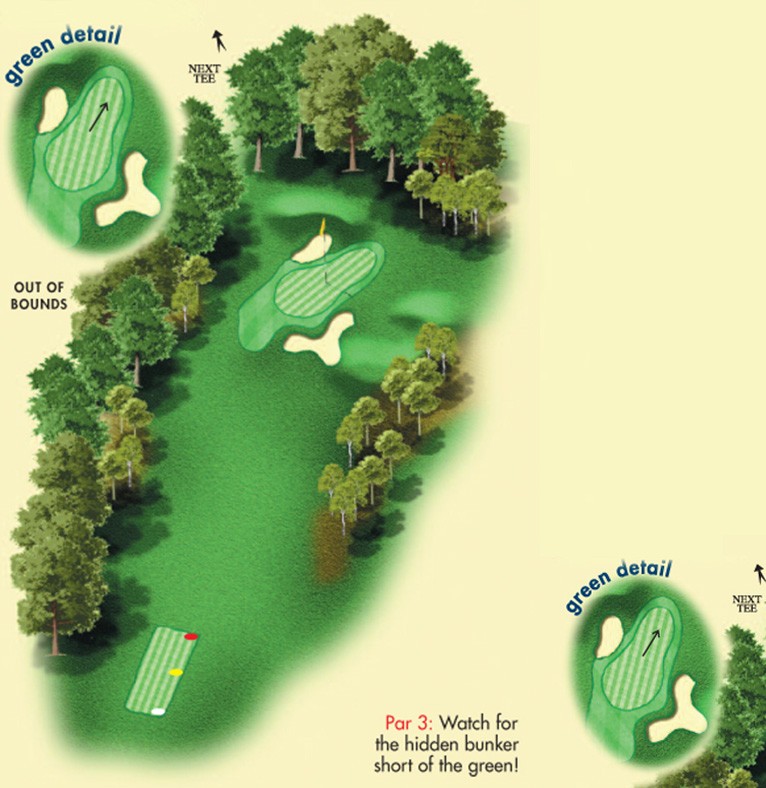
Jubilee Hole 5
Par 3: Watch for the hidden bunker short of the green
| TEE | YDS | PAR |
|---|---|---|
 |
217 | 3 |
 |
207 | 3 |
 |
177 | 3 |
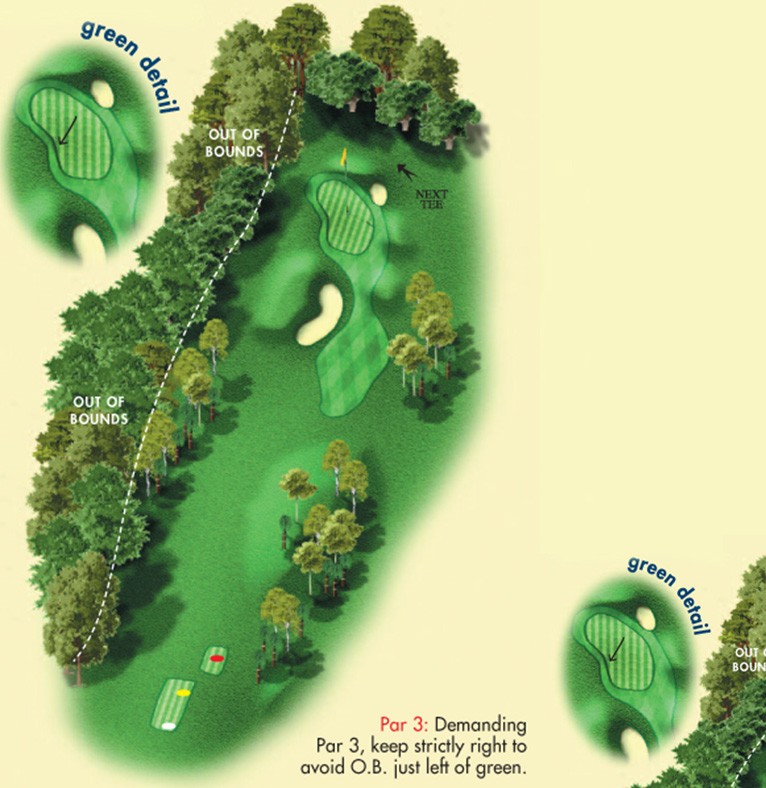
Jubilee Hole 6
Par 3: Demanding :Par 3, keep strictly right to avoid O.B. just left of green.
| TEE | YDS | PAR |
|---|---|---|
 |
268 | 4 |
 |
260 | 4 |
 |
240 | 4 |
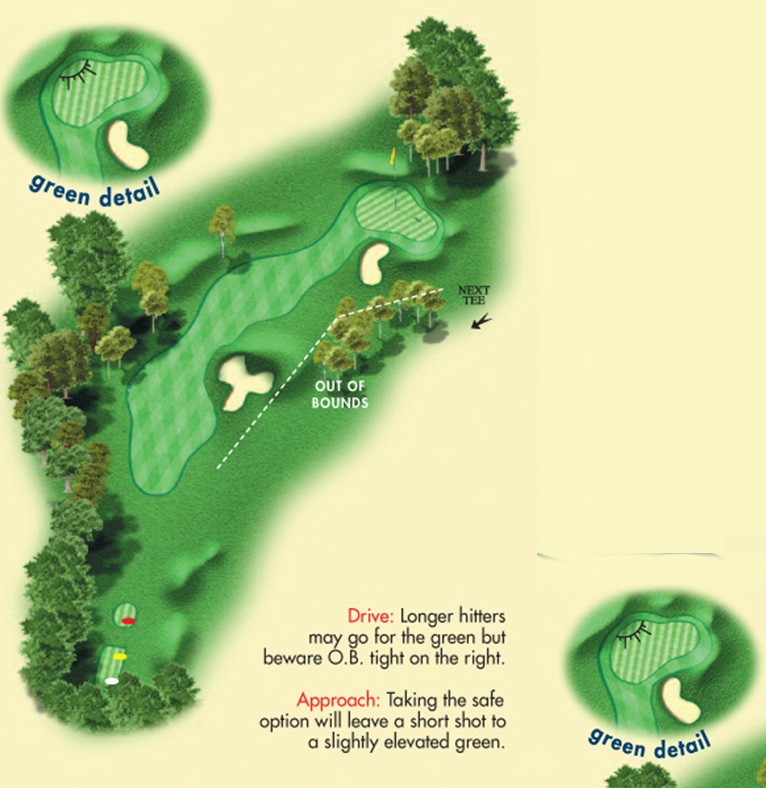
Jubilee Hole 7
Drive: Longer hitters may go for the green but beware O.B. tight on the right.
Approach: Taking the safe option will leave a short shot to a slightly elevated green.
| TEE | YDS | PAR |
|---|---|---|
 |
127 | 3 |
 |
116 | 3 |
 |
103 | 3 |
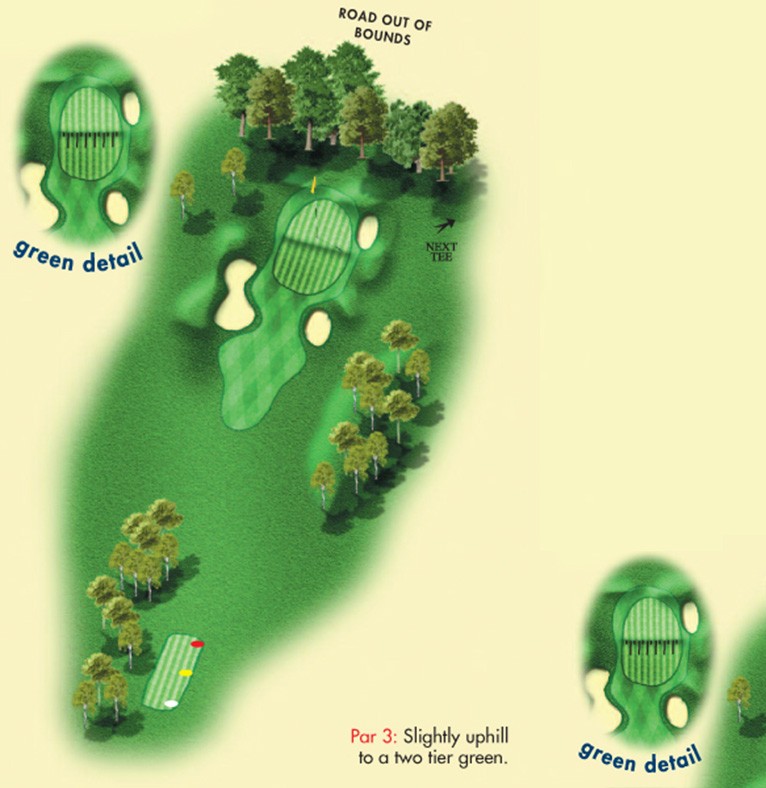
Jubilee Hole 8
Par 3: Slightly uphill to a two tier green..
| TEE | YDS | PAR |
|---|---|---|
 |
383 | 4 |
 |
354 | 4 |
 |
316 | 4 |
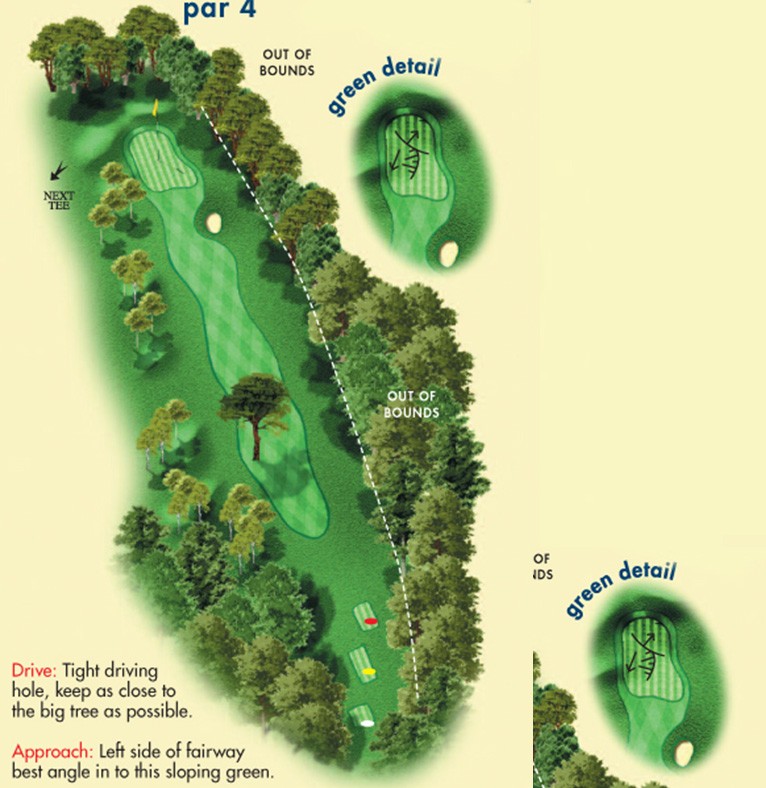
Jubilee Hole 9
Drive: Tight driving hole, keep as close to the big tree as possible.
Approach: Left side of fairway best angle in to this sloping green..
| TEE | YDS | PAR |
|---|---|---|
 |
256 | 4 |
 |
245 | 4 |
 |
215 | 4 |
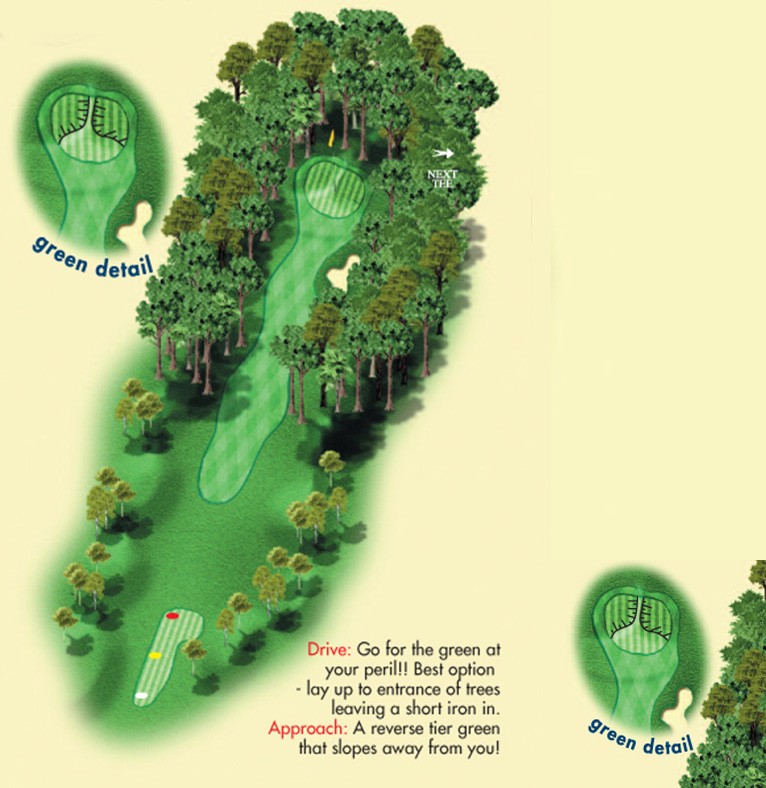
Jubilee Hole 10
Drive: Go for the green at your peril!! Best option- lay up to entrance of trees leaving a short iron in.
Approach: A reverse tier green that slopes away from you!
| TEE | YDS | PAR |
|---|---|---|
 |
228 | 4 |
 |
275 | 4 |
 |
241 | 4 |
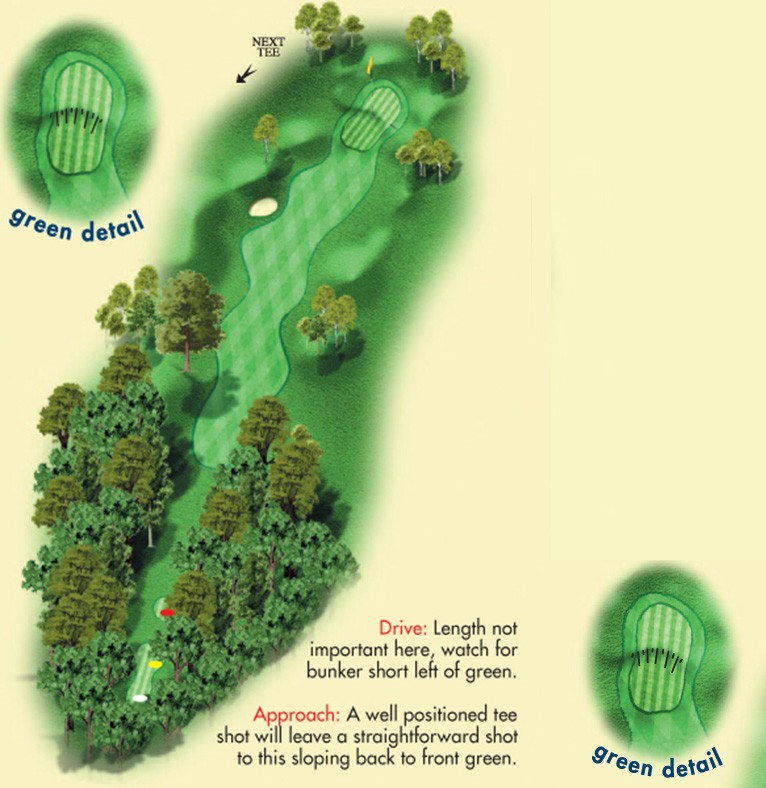
Jubilee Hole 11
Drive: Length not important here, watch for bunker short left of green.
Approach: A well positioned tee shot will leave a straightforward shot to this sloping back to front green.
| TEE | YDS | PAR |
|---|---|---|
 |
111 | 3 |
 |
106 | 3 |
 |
98 | 3 |
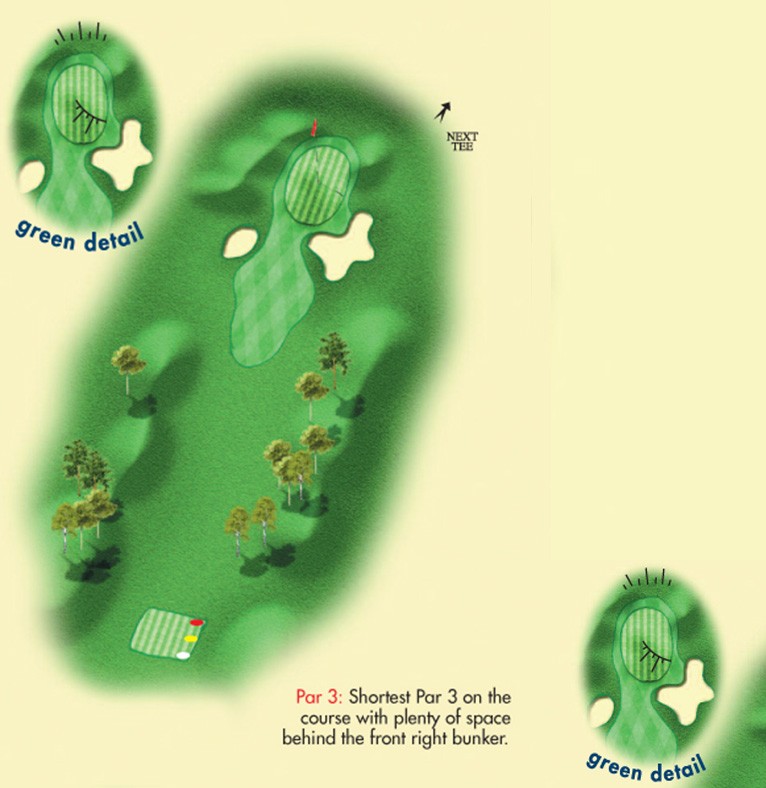
Jubilee Hole 12
Par 3: Shortest Par 3 on the course with plenty of space behind the front right bunker..
| TEE | YDS | PAR |
|---|---|---|
 |
383 | 4 |
 |
361 | 4 |
 |
328 | 4 |
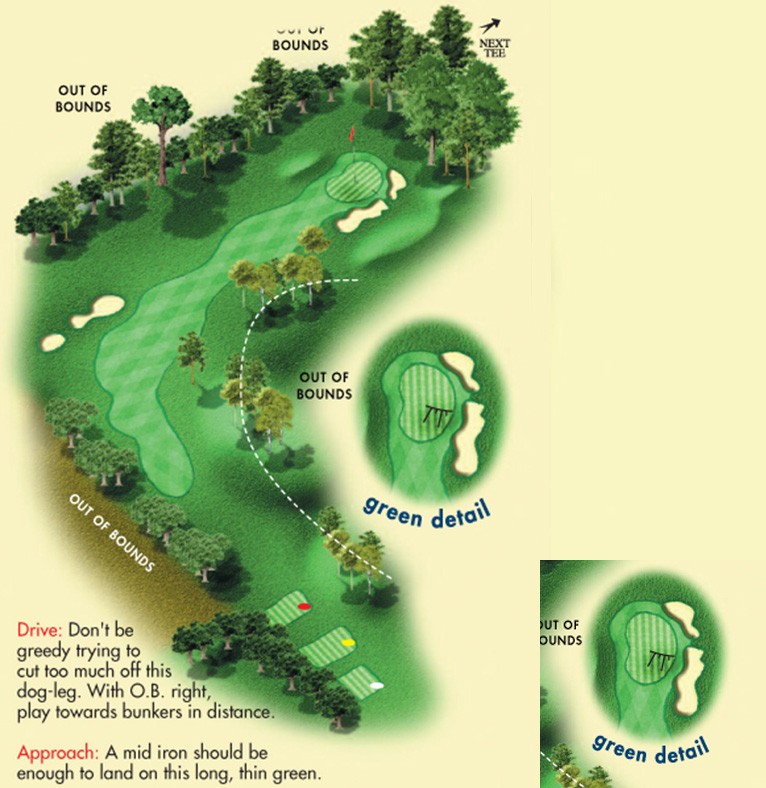
Jubilee Hole 13
Drive: Don’t be greedy trying to cut too much off this dog-leg. With O.B. right, play towards bunkers in distance.
Approach: A mid iron should be enough to land on this long, thin green.
| TEE | YDS | PAR |
|---|---|---|
 |
177 | 3 |
 |
172 | 3 |
 |
164 | 3 |
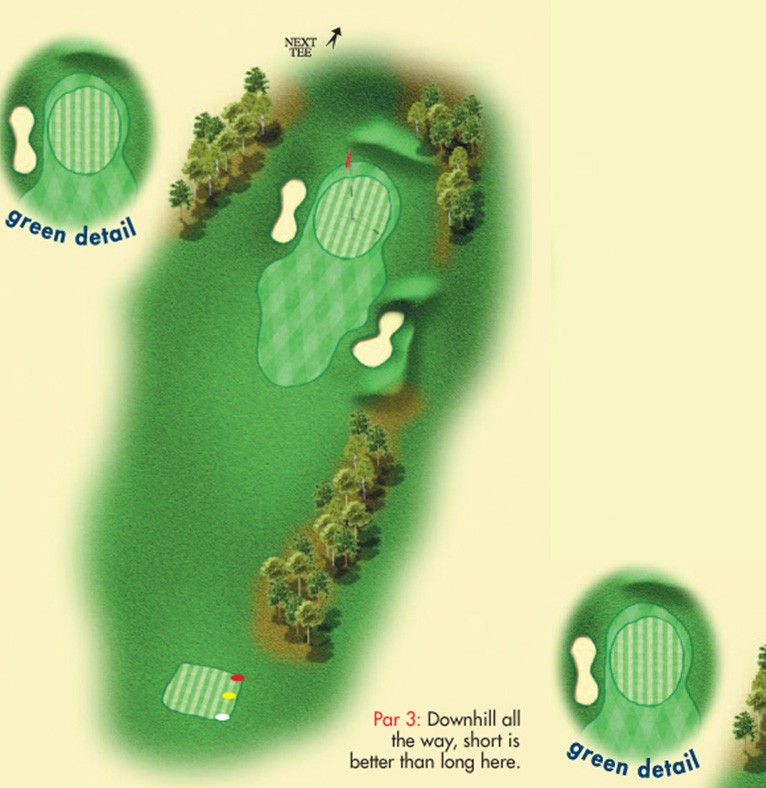
Jubilee Hole 14
Par 3: Downhill all the way, short is better than long here.
| TEE | YDS | PAR |
|---|---|---|
 |
349 | 4 |
 |
338 | 4 |
 |
306 | 4 |
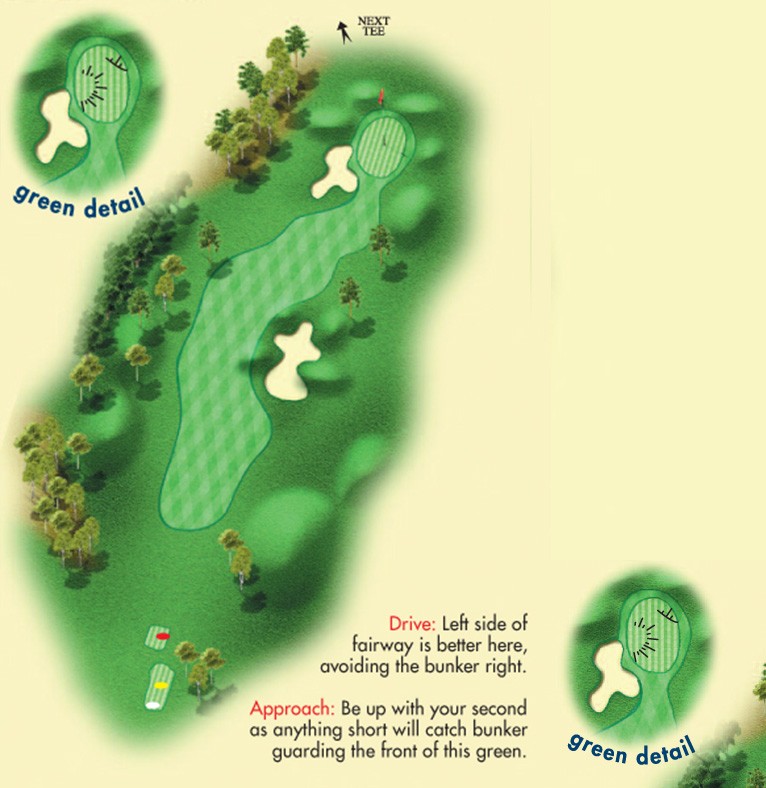
Jubilee Hole 15
Drive: Left side of fairway is better here, avoiding the bunker right.
Approach: Be up with your second as anything short will catch bunker guarding the front of this green.
| TEE | YDS | PAR |
|---|---|---|
 |
153 | 3 |
 |
147 | 3 |
 |
140 | 3 |
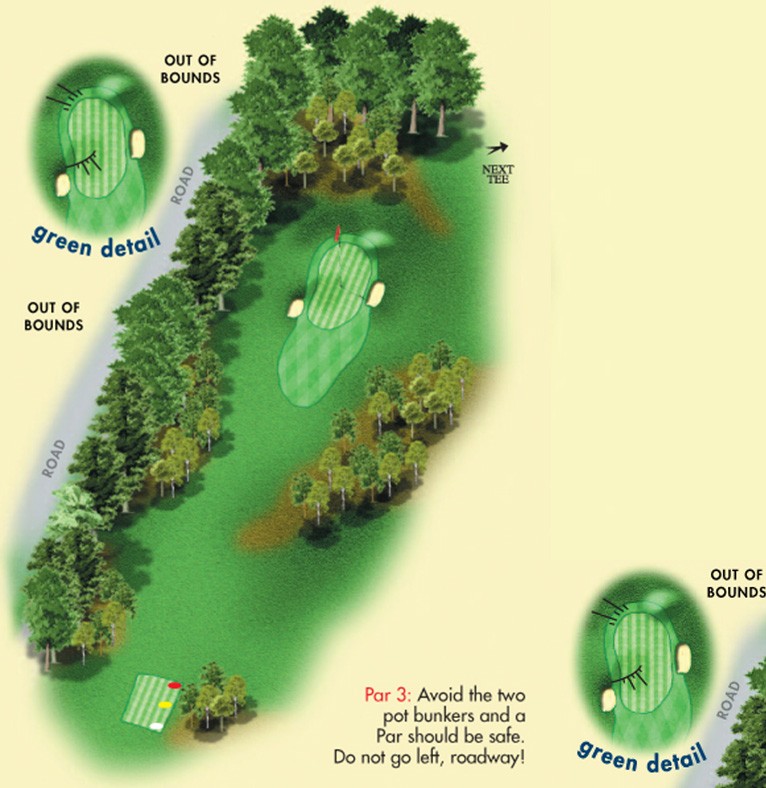
Jubilee Hole 16
Par 3: Avoid the two pot bunkers and a Par should be safe. Do not go left, roadway!
| TEE | YDS | PAR |
|---|---|---|
 |
156 | 3 |
 |
142 | 3 |
 |
123 | 3 |
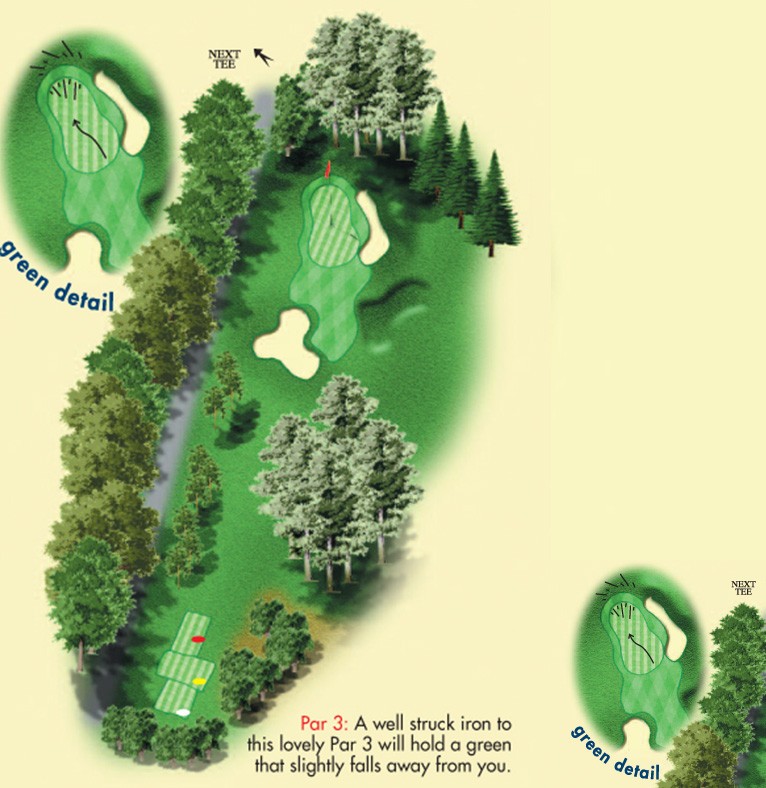
Jubilee Hole 17
Par 3: A well struck iron to this lovely Par 3 will hold a green that slightly falls away from you.
| TEE | YDS | PAR |
|---|---|---|
 |
250 | 4 |
 |
244 | 4 |
 |
208 | 4 |
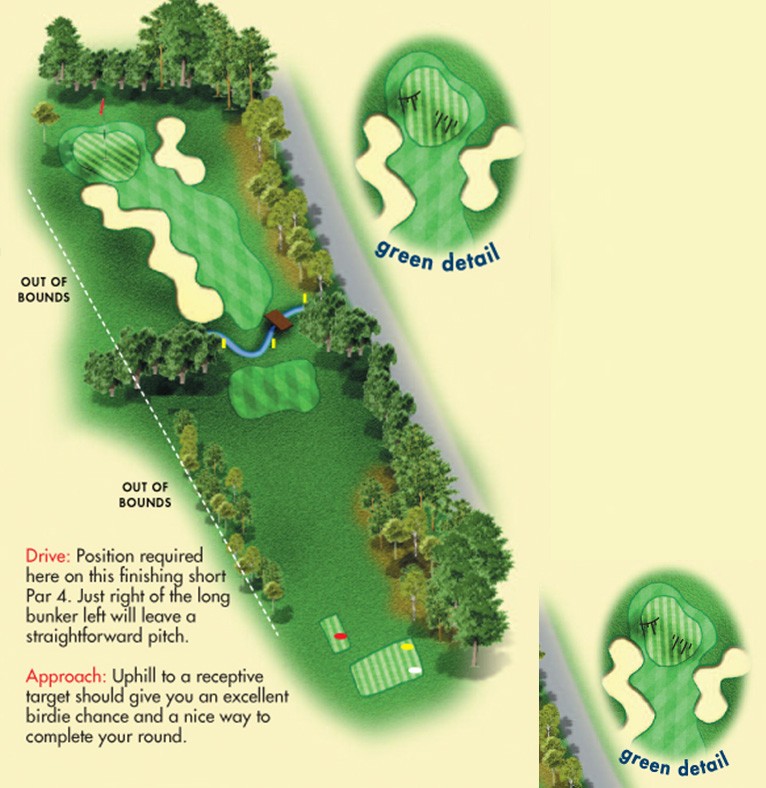
Jubilee Hole 18
Drive: Position required here on this finishing short Par 4. Just right of the long bunker left will leave a straightforward pitch.
Approach: Uphill to a receptive target should give you an excellent birdie chance and a nice way to complete your round.

